Want to take pictures of your screen? This guide will show you how to use snipping tool Windows 11. It will also explain how to make changes to these pictures and save them. Windows used to do this with the Snipping Tool, but in Windows 11, they’ve improved it. They replaced the old Snipping Tool and Snip & Sketch apps with a better one that’s easier to use.
This new tool lets you take pictures in different shapes. You can pick a square, draw freely, or snap a whole window or the whole screen. The second part is the editor that helps you cut, write on, and save or send your pictures.
How to Open the Snipping Tool ?
You can open the Snipping Tool in two ways. The first way is to open the app and choose the settings you want, and the other way is to start taking pictures. Here’s how:
Option 1: Opening Snipping Tool
Use the Windows Search on the Taskbar to find and open the Snipping Tool app.
Option 2: Trigger Snipping Tool
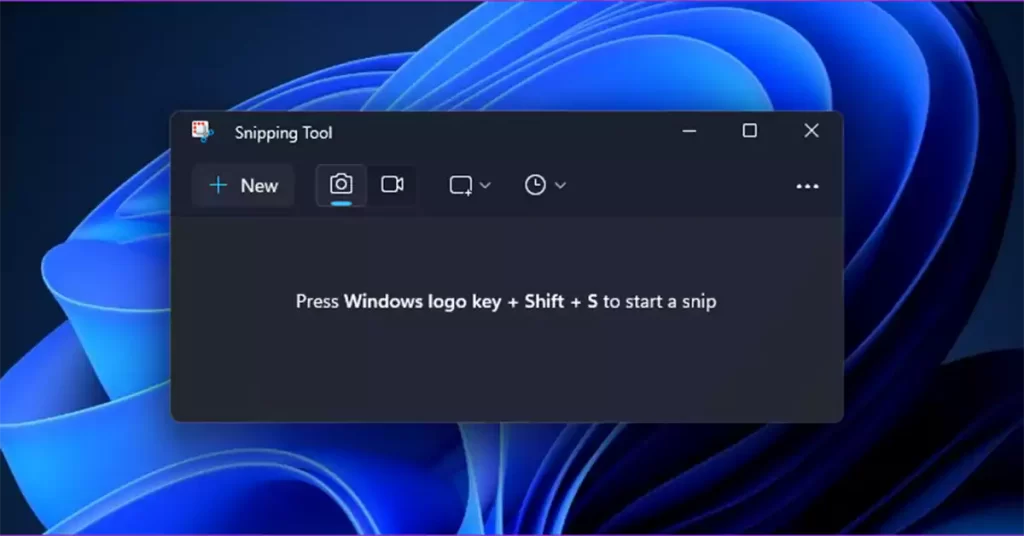
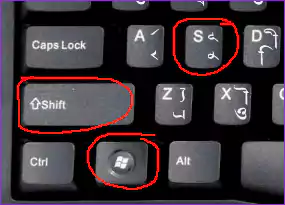
You can press “Windows + Shift + S” so that you take a screenshot directly.
Customizing Your Snipping Tool
Before you use the tool, you can change the settings to make it work the way you like. You can’t change how it records videos, though. Here’s how to do it:
- First of all open the app.
- Then click on the three dots menu “See more” icon.
- Now choose the “Settings.”
- And, In the settings, you can pick from three sections: Shortcuts, Snipping, and Appearance, and adjust the options to fit your needs.
how to use snipping tool Windows 11 with Keyboard
You can use the Snipping Tool in Windows 11 whenever you like. Just follow these simple steps to activate the Snipping Tool and start taking screenshots.
- Press the Windows Key + Shift + S on your keyboard.
- At the top, pick if you want to take a rectangular picture, a freeform one, capture a specific window, or snap the whole screen.
- After selecting the type of screenshot you want (like rectangular or freeform), choose the area you want to capture.
- Your screenshot will automatically be saved to your computer’s clipboard so you can easily share it later.
Take Screenshots with the Snipping Tool with Mouse
- Click on “Start.”
- Type “snipping tool” and press “Enter.”
- Choose “New” to take a picture of your screen.
- The default shape is a rectangle. You can change it by clicking on the toolbar: Rectangular, Window, Full-screen, or Free-form.
- Your picture is copied to your computer’s clipboard. After taking the picture, a message appears with more options for editing.
Using the Print Screen Key as a Shortcut button
If it’s tricky to press “Windows + Shift + S” all at once, you can make things easier by using the print screen key on your keyboard to take a screenshot with the Snipping Tool.
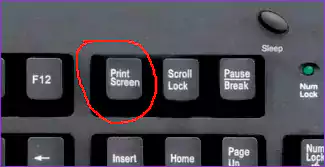
Just click on where you can see “Change in Windows Settings” and to the “Print screen key shortcut” option. This will take you to the “Accessibility > Keyboard” section in the Settings app, where you can turn on the “Use Print screen key to open screen snipping” option.
Editing a Screenshot
After you’ve taken a picture of your screen, you can easily change it. You can write on it, draw stuff, or make it smaller. Here’s how:
- Click on the picture pop-up at the bottom right of your screen after taking the picture.
- Choose the tools you want to use. You can pick a pen, a highlighter, and even a ruler or protractor. If you have a touch screen, you can also write on the picture.
- Saving a Screenshot
Usually, the Windows 11 Snipping Tool puts your latest picture on your computer’s clipboard. This lets you paste it into chat apps or other places. But sometimes you might want to keep the picture for later. Here’s how you do that:
- Click or tap the picture pop-up at the bottom right of your screen.
- Find the menu at the top of the Snipping Tool window and make any changes you need.
- Once you’ve done this, click the “Save as” button, that appears at the top. It looks like a floppy disk and is to the right of the magnifying glass.
- Give your picture a name and choose where to put it.
You can also read how to use snipping tool Windows 11 from the Microsoft website