
It is very annoying when you are working on your computer and you face a problem with the network. a huge number of people spend so much time solving this problem. If you also face a Problem With The Driver For The WI-FI Adapter here I am to solve your problem fast and quickly.
But before we start solving the problem let’s see some common reasons for Wi-Fi adapter issues:
The reason for the “there might be a problem with the driver for the Wi-Fi adapter” problem?
There may be multiple problems with this. However, I collected some common causes that are reported by many online computer users on Microsoft’s official website and some from forum sites. Here is the list,
- The Wi-Fi driver is very old or outdated.
- WIn-shock needs to be reset.
- Some necessary services have stopped working.
- antivirus network filters are blocking your internet connection.
- Some problems with network properties.
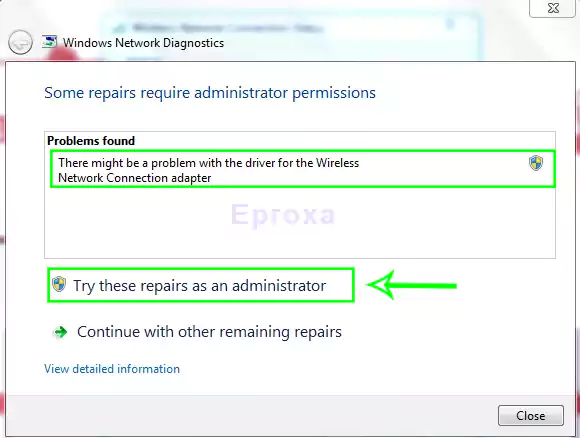
Solution 1: Try a built-in troubleshooter.
Microsoft has an amazing feature for finding out 90 % time any kind of issue. so first of all we can try this feature by the below steps:
- First press Windows Key + I To open your system settings.
- Once you open the system setting, Find and click the Update & Security Or Privacy & Security section.
- find and click Additional Troubleshooters.
- Find the Network Adapter option and click.
- Click Run The Troubleshooter.
- Finally, complete the process.
If the troubleshooter finds the issue your network connection will be connected immediately. Otherwise, we will for our next solution.
Solution 2: Re-install or update your Wi-Fi adapter.
Sometimes we install older versions of the adapter driver, This also may be the Problem With The Driver For The WI-FI Adapter. So we need to check our driver if it’s updated or not. If the diver is outdated then we have to reinstall or update it.
For Windows 11
- Press Windows Key,
- On the top search bar, search for Device Manager.
- Now click the Device Manager option. Once it opens you can see all the driver list.
- Find the Network adapter and click the right button on your mouse. You will see Update Driver, Disable Device, Uninstall Device.
- Choose Update Driver and click.
- Now select Search Automatically For Driver And complete the next process.
For Windows 10
- Click the Start Button.
- Type Run. And select the run option, A run dialog box will open.
- In the dialog box type “devmgmt.msc”. And the Device Manager will open.
- Now Follow the next processes as described above for Windows 11.
Solution 3: Reset Winsock.
“netsh winsock reset” is one of the most helpful commands ever. It can help to reset your winsock setting to bring it back to the default situation. If your windows have any problem with winsock, then we can go for it.
- First of all, click the Start button
- Now start typing “Command Prompt” > Right-click on it > “Run As Administrator”
- In another way, you can hit the “Windows key + R” . Once you hit the “run” dialog box will open.
- In the run box type “cmd” and hit Ctrl + shift and enter. The command prompt will be opened automatically as administrator.
- In the command prompt type this text :
netsh winsock reset
netsh int ip reset reset.log hit
- After typing this command make sure you hit enter. and wait for the result if the winsock has been reset or not. If it happens successfully. Restart your PC / laptop. Your internet connection should be active.
If still the issue isn’t fixed, follow the below steps:
Solution 4: Check if your all necessary services are running or not.
The most necessary service is “WLAN AutoConfig“. If this service is off your internet connection will never active. so to solve the Problem With The Driver For The WI-FI Adapter, make sure this service is turned on. To do this follow the below steps:
- Type Windows key + R to open the run dialog box.
- Type “services.msc” and hit enter. The services list will open,
- Now check below the “WLAN AutoConfig” and Right-click on it > Click Properties > A new pop-up will appear.
- Now look carefully, Make sure that “Startup Type” is “Automatic“.
- Make sure the service status is Running. If it’s not running hit the Start button,
- Once the service is running, Restart your PC / Laptop.
now check if your internet connection is active or not.
Solution 5: Disable the antivirus network filter driver.
Sometimes antivirus network filter drivers block internet connection for some suspicious activities. it’s a part of an antivirus security system. So you should take care of your browsing activities, Anyway, let’s talk about how you can solve this problem.
- Hit the Windows key + R
- The run dialog box will appear.
- Now type “ncpa.cpl” and hit enter. Once done the network window will open,
- select your active internet connection adapter. Hit the right button on your mouse and choose properties.
- An Ethernet Properties dialog box will appear.
- now find the antivirus name that you use.
- Uncheck the antivirus name and click apply and finally click OK.
- restart your PC / Laptop.
Now your internet connection should be active,
Conclusion:
Finally, I hope that now you understand why the message “there might be a problem with the driver for the Wi-Fi adapter” appears. And how to solve the Problem With The Driver For The WI-FI Adapter. However, it’s not so easy but when you know the right way to find out the problem it will be easier to solve.
FAQ:
Go to Settings> Network & Internet > Advance Network Setting > Reset Network > Reset Now.
Hit the Windows key And search for Device Manager. select “Device Manager” and you will find the all-driver list. now select WiFi adapter.
Hit the Windows key + R > The run dialog box will appear > type “ncpa.cpl” and hit enter > Select Ethernet and right click on it > select Enable.
Right-click on the windows button > select “Device Manager” > select the network adapter > Right-click on the driver > select “Search Automatically For Driver”
First of all, you should restart your modem or router, and wait for a few seconds. After this check if your network adapter is enabled or not. Make sure your Network Adapter Driver is updated. If still having the problem, Troubleshoot your network adapter.