Let me take you back to a frustrating day a few days ago. My PC was crawling slower than a snail on a lazy afternoon. Every click felt like waiting for a pot of water to boil, and I was ready to toss it out the window! But then, I stumbled upon a hidden Windows feature that changed everything. It’s called Storage Sense, and trust me, it’s a lifesaver. Today, I’m sharing my personal journey of how I sped up my PC and boosted its performance, step by step, just for you. Stick with me, and let’s make your computer feel brand new too!
The Day My PC Let Me Down
Picture this: I was working late, trying to finish a project, when my PC decided to take a nap. Programs wouldn’t open, and the fan sounded like a jet engine. I wondered, “Why is my PC so slow?” After some soul-searching, I realized it was bogged down by too many startup apps, a nearly full hard drive, outdated drivers, and sneaky background processes. It felt personal—like my trusty companion had betrayed me! That’s when I knew I had to fight back, and my search led me to Storage Sense, a hidden Windows tool I’d never noticed before.
Discovering the Hidden Gem: Storage Sense
One rainy evening, while scrolling through forums, I found a tip about Storage Sense. It’s this amazing built-in feature in Windows 10 and Windows 11 that I’d overlooked for years. I turned it on, and it felt like uncovering a secret treasure chest! Storage Sense automatically clears junk files, empties my Recycle Bin, and even manages cloud files to free up space. The first time I ran it, I was shocked to see it reclaim 5GB of space—enough to breathe new life into my PC! If you’re tired of a sluggish machine, this could be your hidden gem too. I learned more about this feature from Microsoft’s official guide on Storage Sense.
My Step-by-Step Adventure to sped up my PC
Turning on Storage Sense wasn’t hard, but it felt like a mini-adventure. Here’s how I did it—and how you can too. Grab a cup of tea, and let’s dive in together!
Step 1: Finding the Settings
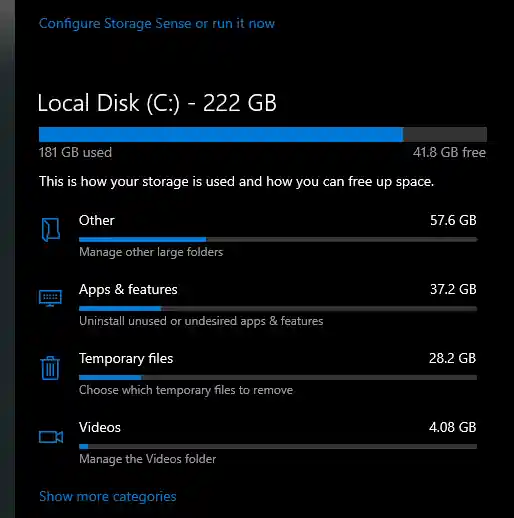
One quiet morning, I clicked the Start button on my taskbar, typed Settings, and hit Enter. In the Settings window, I scrolled to System and clicked Storage. It was like opening a door to a new world! You can do this too—give it a try.
Step 2: Flipping the Switch
In the Storage menu, I spotted Storage Sense and toggled it to On. Then, I clicked Configure Storage Sense or run it now to tweak it. It was a small action, but it felt empowering. Go ahead and turn it on—feel that power!
Step 3: Making It My Own
I customized it to run every week, deleting temporary files and old Recycle Bin items. I even tried the Clean Now button, and watching the space free up was like magic! You can pick what works for you—maybe monthly runs or when space runs low.
Step 4: Seeing the Magic Happen
After running it, I checked the Storage menu again. I’d freed up 6GB this time—unbelievable! It’s like giving my PC a fresh start. Check your results too—you’ll be amazed.
This journey turned my slow PC into a speed demon. Follow these steps, and you’ll feel the difference too!
You may like this How To Transfer Microsoft Office To Another Computer
Extra Tricks I Learned Along the Way
Storage Sense was just the beginning. Along my journey, I picked up more tricks to keep my PC humming. Here’s what worked for me—and can for you:
- Taming Startup Chaos:
- I pressed Ctrl + Shift + Esc to open Task Manager.
- In the Startup tab, I disabled apps like that old game I never play.
- My boot time dropped from 2 minutes to 30 seconds!
- Updating Drivers:
- I searched Device Manager in the Start menu.
- Right-clicked my graphics card and hit Update driver.
- No more lag—smooth sailing now!
- Clearing Browser Clutter:
- In Chrome, I went to Settings > Privacy and Security.
- Cleared the cache, and my browsing felt snappy again.
- Running Disk Cleanup:
- I typed Disk Cleanup in the Start menu.
- Selected my C: drive and deleted temp files.
- Another 2GB freed—victory!
These little wins made my PC feel like a champ. Try them, and share your results with me!
Conclusion
My PC transformation was a game-changer. From a sluggish beast to a speedy sidekick, Storage Sense and my extra tricks saved the day. I now enjoy smooth multitasking and quick startups. You can have this too—try these steps, tweak them to your style, and feel the joy of a faster PC. Drop me a note if it works for you—I’d love to hear your story!